Getting Started
Omeda’s AI-Powered Content Tagging tools automatically analyze and tag your web and email content based on a wide range of attributes—including topic, tone, sentiment, keyword relevance, and more—transforming it into actionable data. These structured tags are then combined with audience behavioral data to identify the types of content your users engage with and show affinity for. Marketing, editorial, and audience development teams can use this intelligence to automate targeting, align messaging with audience interests, and scale content strategies—without the need for manual tagging or third-party systems.
For both Web and Email Content the following tag categories will be used:
-
Context : Describes how the content relates to a broader theme or overarching narrative, helping to situate it within larger trends or topics.
-
IAB Taxonomy : Categorizes content using the IAB’s industry-standard taxonomy to support advertising alignment and discoverability.
-
Job Title : Tags content by the professional roles or titles it’s most relevant to—such as CEOs, marketers, or IT directors—based on the U.S. Bureau of Labor Statistics’ Standard Occupational Classification (SOC) system.
-
Objective : Identifies the primary purpose of the content, such as education, promotion, or engagement.
-
Tone : Describes the emotional or stylistic tone of the content, such as formal, casual, optimistic, or urgent.
-
Customer Journey : Indicates which stage of the customer lifecycle the content targets— Awareness, Consideration, Conversion, Retention or Loyalty.
-
Industry : Classifies content based on its relevance to specific industries—such as healthcare, finance, or retail—using standardized labels derived from the NAICS taxonomy.
-
Keywords : Highlights notable terms or phrases that reflect the main topics or themes of the content.
-
Product or Service : Flags products or services featured or discussed in the content.
-
Summary : Provides an AI-generated summary of the content’s key points and takeaways.
-
Sentiment Score : Represents the overall emotional tone of the content as a numerical sentiment score, also indicated with an emoji.
If you're interested in adding AI-Powered Content Tagging to your Omeda toolkit, reach out to your Client Success Manager for more information on pricing and implementation.
Tagging Email Content
Tagging in Email Builder
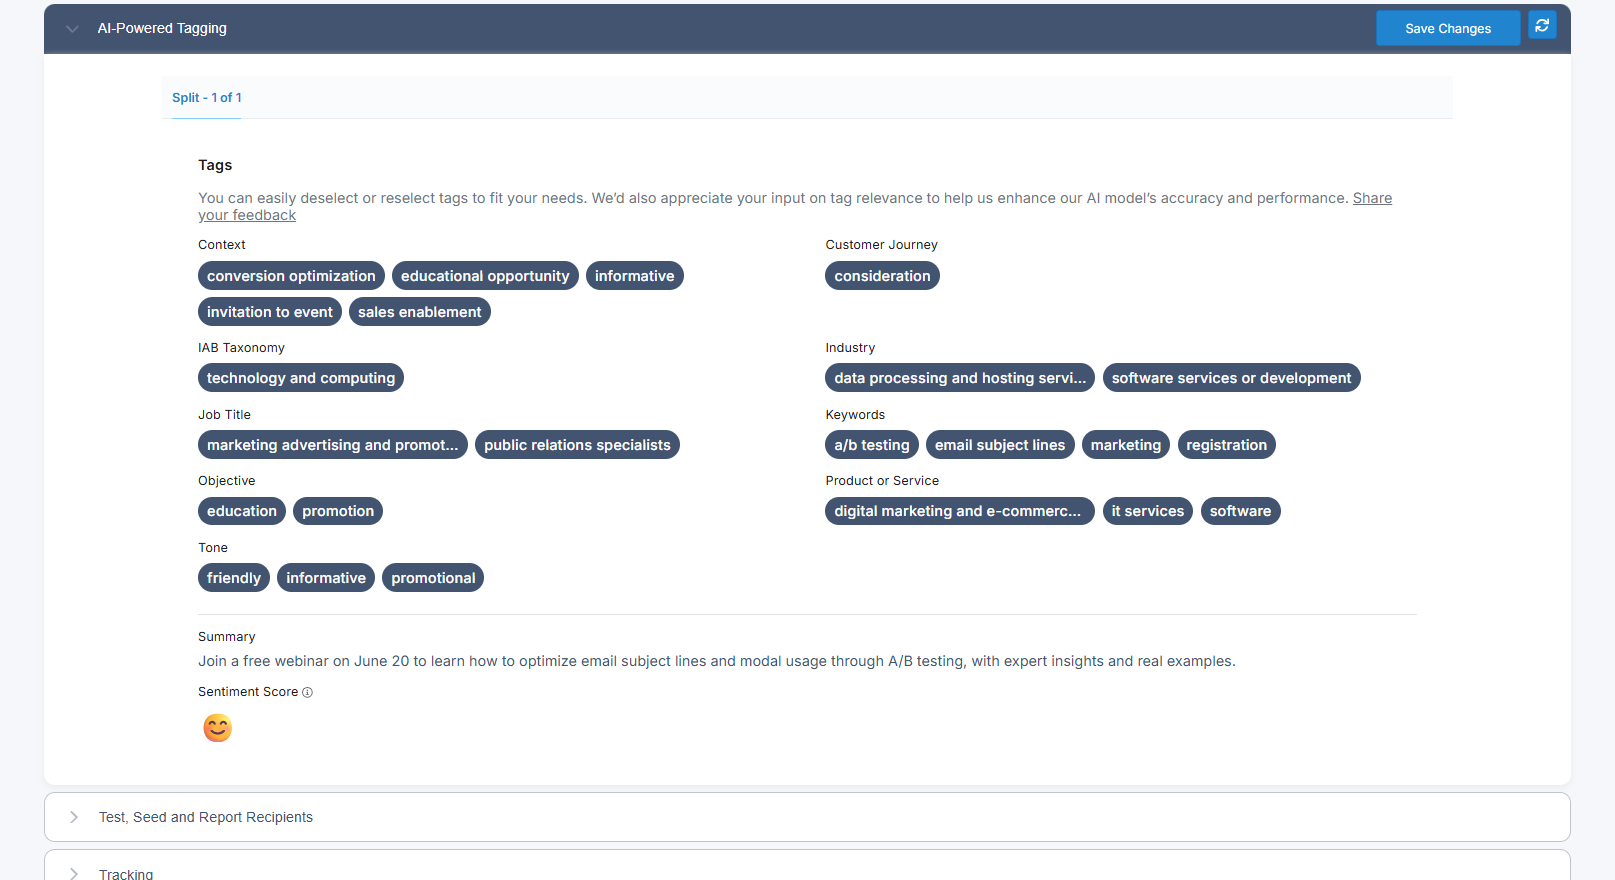
AI-Powered Tagging is automatically applied as email content is created or updated in Email Builder. As users make changes to message content, tags are dynamically generated and displayed in the AI-Powered Tagging pleat—located directly below the Message Content section.
If the email has multiple splits, each split will display its own unique set of tags based on that variation’s content.
Users with View AI-Powered Content Tags permission will be able to see the tags in real time. Those with Edit Tags access can also submit feedback to improve tag accuracy and relevance.
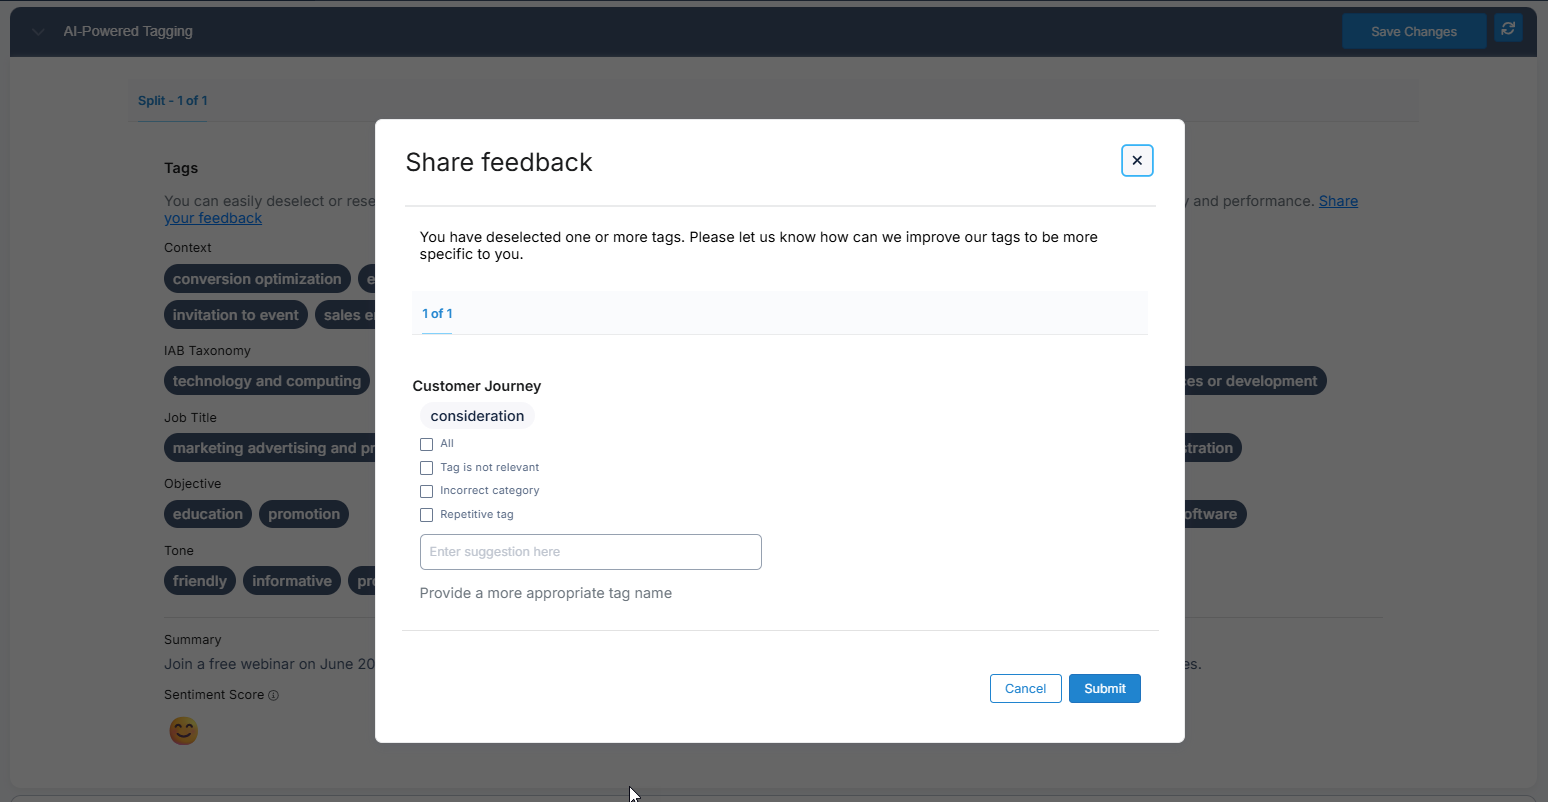
To provide feedback, users can deselect any tags that don’t apply and click Save Changes to submit their preferences. For more detailed input, they can also click the “Share your feedback” link to specify why a tag was removed (e.g., not relevant, incorrect category) and suggest a more appropriate tag if needed. Feedback can be submitted at any time, even if the email deployment is no longer in an editable state.
Tagging in Odyssey
For Email Elements in Odyssey, AI-Powered Tagging is automatically applied under the following conditions:
-
When the voyage or element is published
-
When the AI-Powered Tagging section is opened and the content has changed
-
When the voyage moves to Scheduled status
As in Email Builder, users with View AI-Powered Content Tags permission can see tags in real time. Users with Edit Tags access can also provide feedback to improve accuracy and relevance.
To submit feedback, users can deselect any tags that don’t apply and click Save Changes. For more detailed input, they can click “Share your feedback” to explain why a tag was removed (e.g., not relevant, incorrect category) and suggest a better alternative. Feedback can be submitted at any time, even if the voyage is no longer editable.
Tagging Web Content
Web content tagging is managed through the AI Content Activation section in the CDP menu. This interface provides a centralized workspace for configuring tagging, managing behaviors, and driving content recommendations.
The interface includes the following tabs:
-
Manage Behaviors – Define behavioral triggers for tagging and recommendations
-
Page Settings – Configure tagging rules and metadata at the page level
-
AI-Powered Web Content Tagging – Apply and review AI-generated tags for each page
Together, these tools enable users to apply structured, AI-driven tagging to web content, helping improve discoverability, optimize engagement, and power downstream recommendations.
Manage Behaviors
In the Manage Behaviors tab, all active Olytics behaviors for the database are displayed in a table. Users can manage these behaviors and enable AI-Powered Content Tagging or Content Recommendations by clicking the ellipsis menu next to a behavior and toggling the desired option.
When AI-Powered Content Tagging is enabled, any pages visited in the past 24 hours that are associated with that behavior—and not excluded in the Page Settings tab—will be automatically analyzed and tagged each night. The results of this tagging process can be viewed in the AI-Powered Web Content Tagging tab.
Page Settings
In the Page Settings tab, users can select a behavior from the dropdown to configure which pages should be included or excluded from Content Tagging and Content Recommendations.
Pages can be targeted using the following criteria:
-
URL Patterns – Match pages based on specific strings within the URL
-
Page Type – Filter by the og:type metadata present on the page
-
Manual Exclusions – Search for and exclude specific pages as needed
At the bottom of the interface, the Page Title Source Selection lets users choose which HTML property to use for displaying the page title in recommendations: either the <title> tag or the og:title property.
AI-Powered Web Content Tagging
On this page, users can select any behavior that has web tagging enabled from the dropdown menu. Once selected, all pages that have been analyzed and tagged under that behavior will be listed by URL, along with the date of their most recent successful scan.
Users can click the ellipsis menu next to each URL to review the tags applied to that page.
Users with Edit Tags access can also submit feedback to improve tag accuracy and relevance. To do so, they can deselect any tags that don’t apply and click Save Changes. For more detailed input, they can click “Share your feedback” to explain why a tag was removed (e.g., not relevant, incorrect category) and suggest a better alternative.
Tag Engagement & Affinity Scoring
Once content is tagged, Omeda tracks how your audience engages with each tag—so you can understand not just what topics are present, but which ones actually resonate.
Each night, Omeda calculates tag-level engagement scores for every audience member. For email content, engagement is calculated over a 14-day period based on how audience members interact with content containing specific tags. Positive signals like clicks increase a tag’s score, while negative signals such as unsubscribes reduce it.
For web content, engagement is based on how often and how recently pages with certain tags are visited. Recent activity carries more weight to reflect fresh interest.
In addition to recent engagement, Omeda also calculates affinity scores based on long-term interaction patterns. While engagement highlights what’s happening now, affinity reflects consistent interest over time. These tag-based affinity scores help identify deeper patterns of audience interest—even if someone hasn’t interacted with that topic recently.
Audience members are then placed into quartiles for each tag—ranging from most to least engaged or affinitive—so teams can build highly targeted segments and tailor content delivery accordingly.
Querying your Audience’s AI-Tag Engagement and Affinity
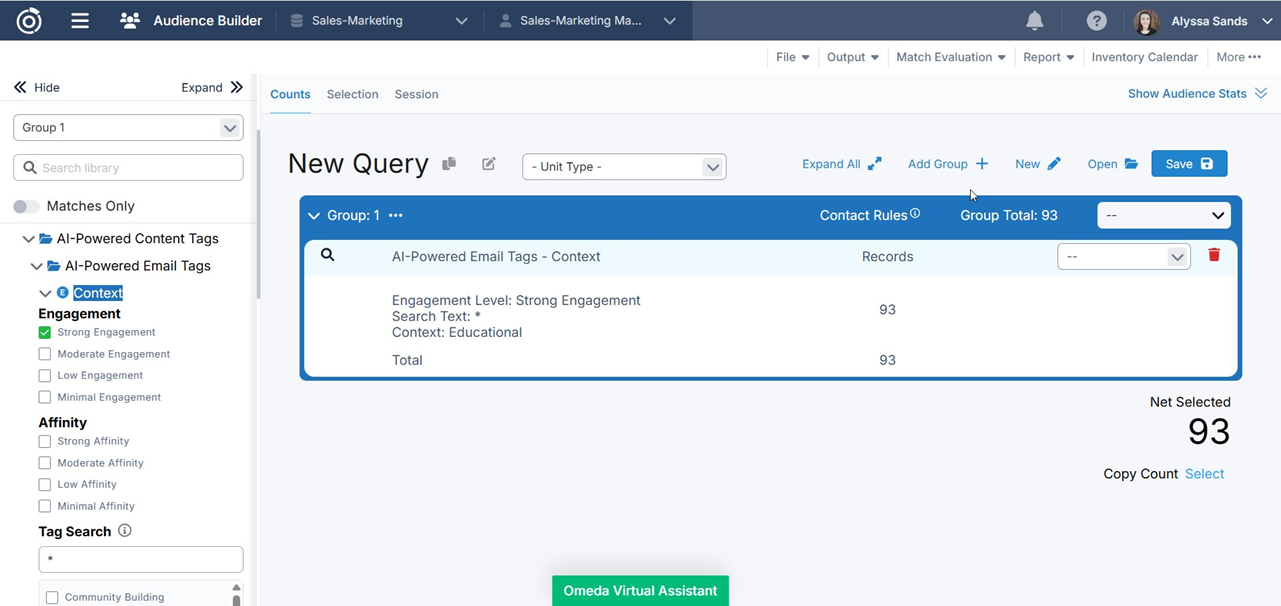
In Audience Builder, once configured, users can create queries using the new folder: AI-Powered Content Tags, with filtering options available for both Email Tags and Web Tags.
For each tag category (e.g., Context, Tone, Industry), users can:
-
Search by tag value using keywords or wildcards
-
Filter by Engagement Level: Strong, Moderate, Low, or Minimal
-
Filter by Affinity Level: Strong, Moderate, Low, or Minimal
This enables teams to build highly targeted segments—such as “audience members with strong engagement in educational context tags”—and activate them across campaigns.
Engagement and affinity filters can be combined with other conditions or behavioral rules to fine-tune targeting and personalize outreach based on how audiences are interacting with specific content themes.
Activation Channels for AI-Tags
Dynamic Content
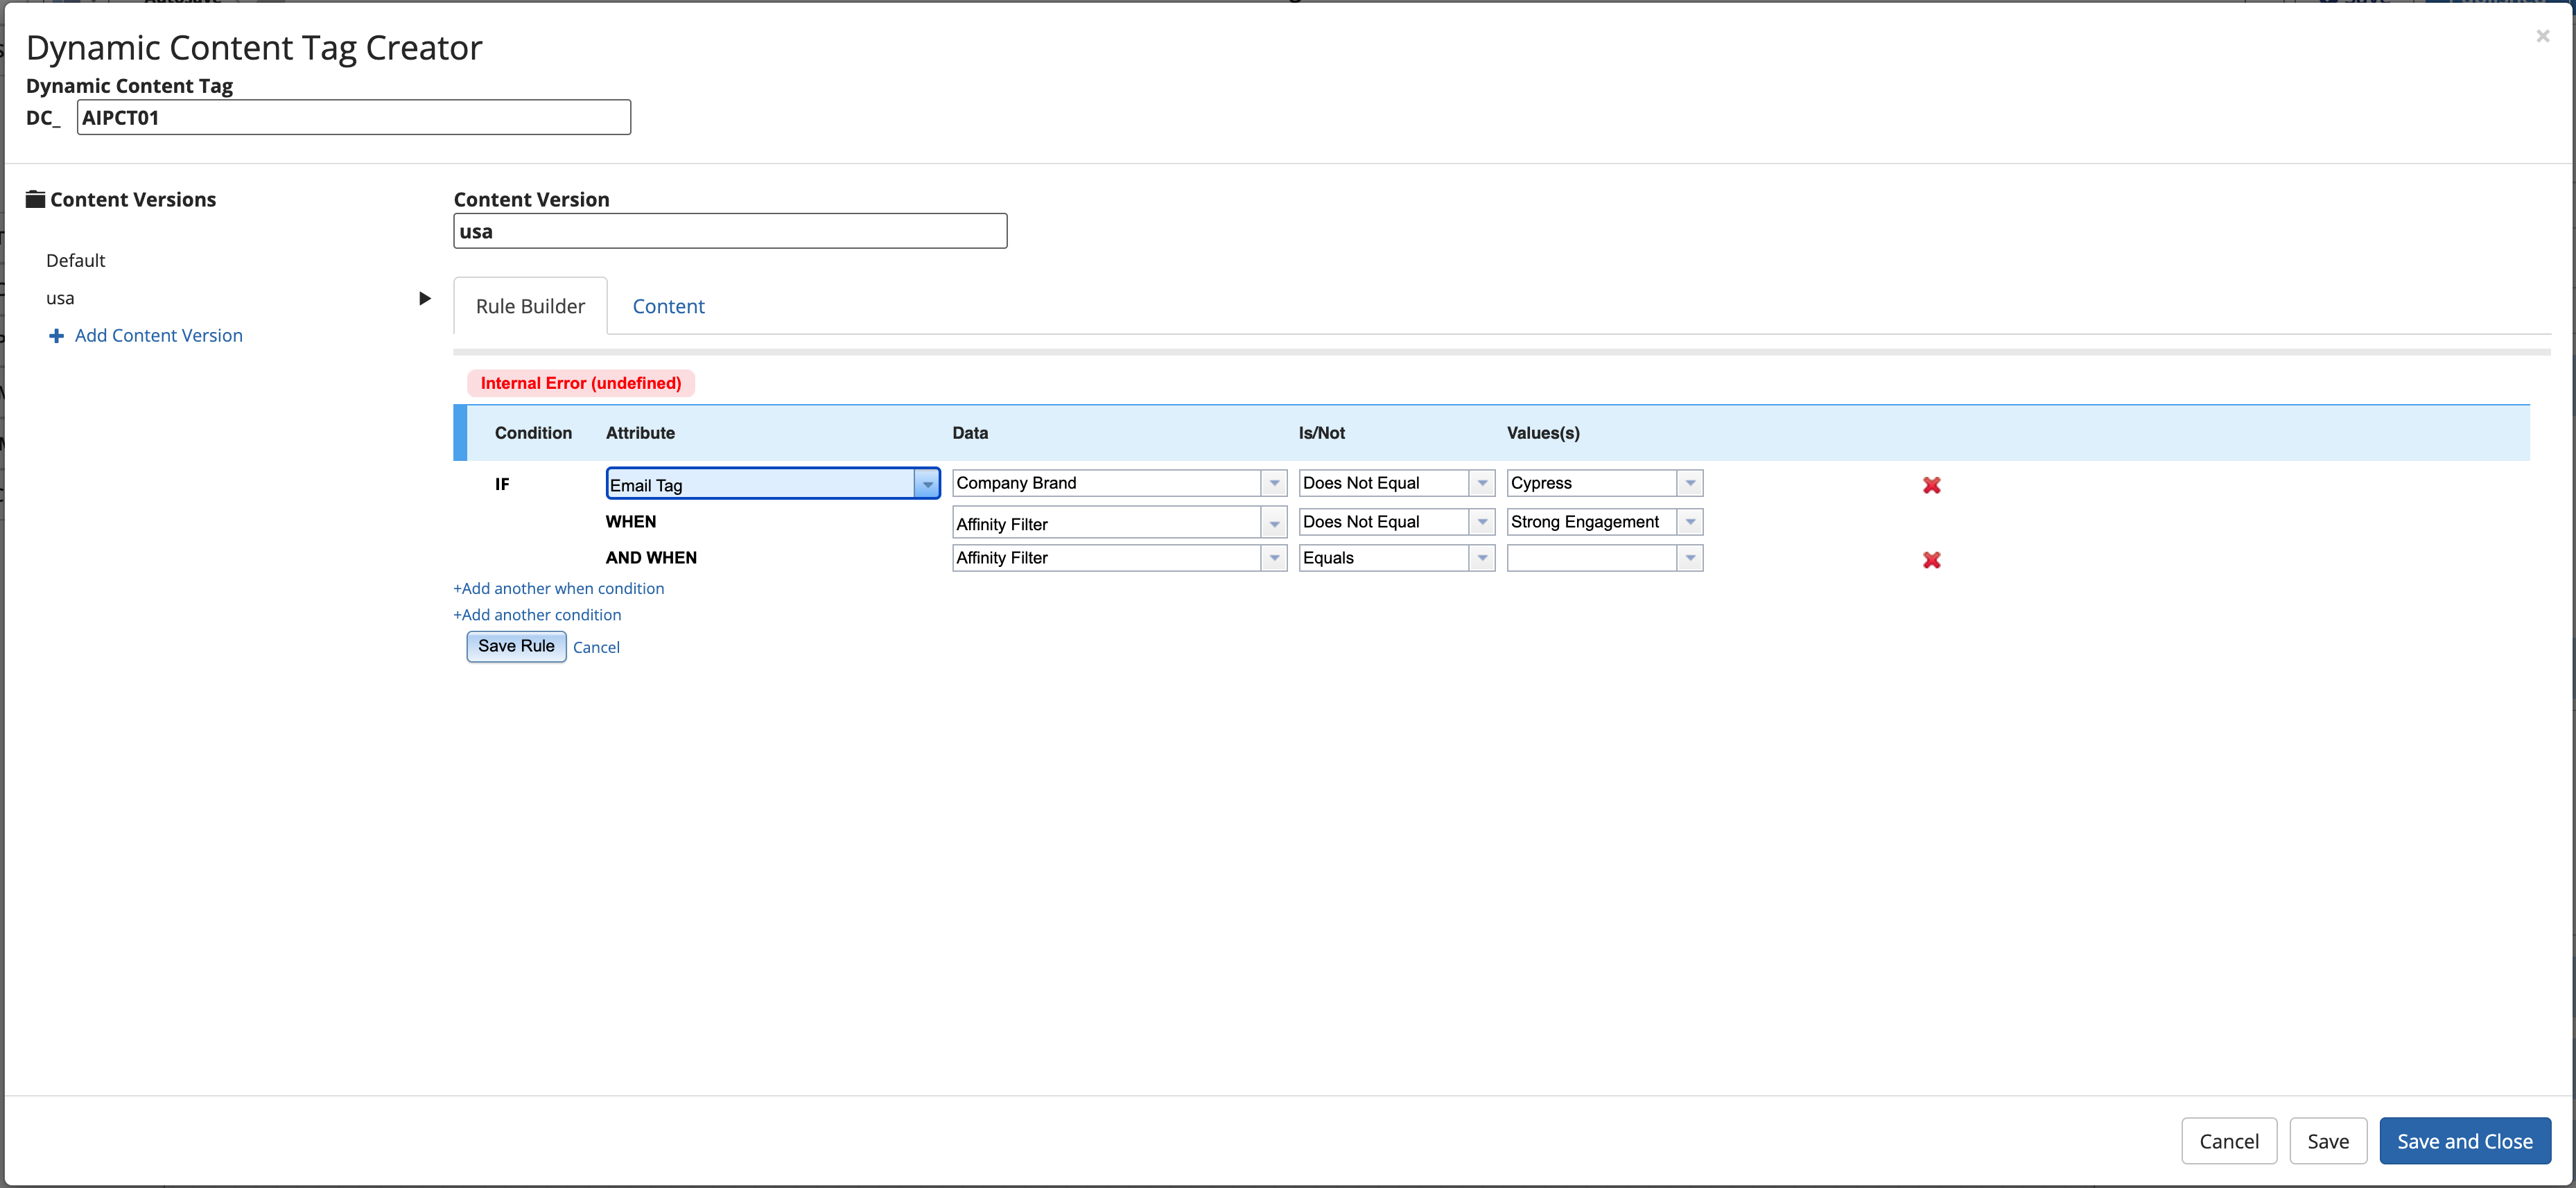
Once your email content is tagged using Omeda’s AI-Powered Content Tagging, those tags become available as filtering options in the Dynamic Content Builder. You can use both Email Tags and Web Tags as rule conditions to tailor which content blocks are shown to which users—based on what they actually engage with.
Marketers can filter based on any tag category (like Tone, Context, or Industry) and refine delivery using tag-specific Engagement or Affinity levels (e.g., Strong, Moderate). This allows for smart personalization at scale—without the need for manual tagging or complex logic.
To get started, look for the AI-Powered Content Tags folder in the Attribute dropdown when building dynamic content rules.
Learn more about Dynamic Content.
Content Recommendations
Omeda’s AI-Powered Content Activation suite includes Content Recommendations as an additional activation channel, enabling users to deliver personalized content experiences across both web and email. The recommender runs nightly across audience members who have visited a page in the last 90 days and, based on the selected algorithm, generates tailored page recommendations for each user with scores indicating the strength of each recommendation.
Users can choose from three approaches: Collaborative Filtering, Tag-Based Filtering, or the premium AI Tag-Based Filtering. Collaborative Filtering groups audience members into cohorts based on behavioral patterns, recommending content popular among users with similar activity. Tag-Based Filtering uses predefined tags or keywords to identify semantic similarities between pages and recommends content based on a user’s historical engagement with those topics.
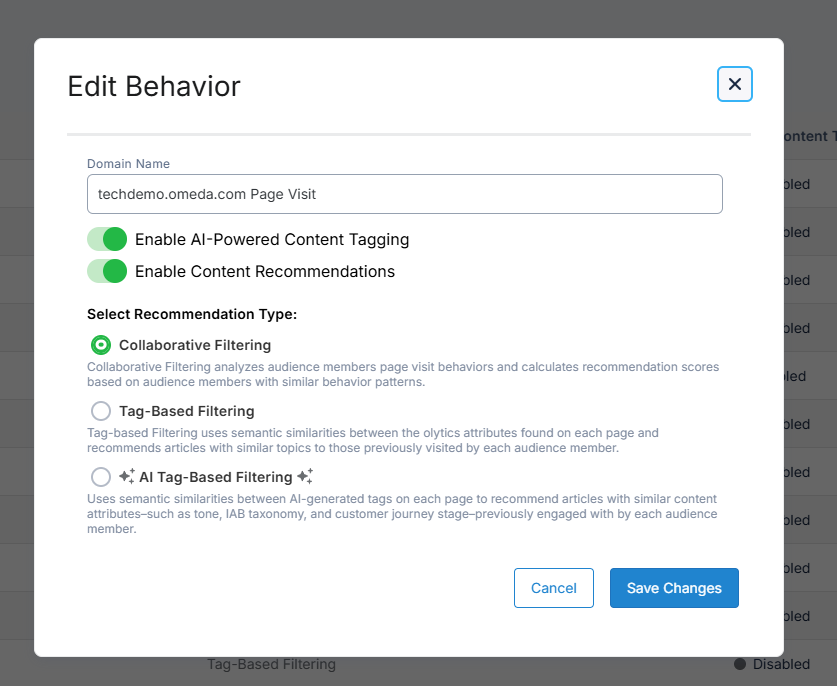
The AI Tag-Based Filtering algorithm extends this further by leveraging AI-generated tags and deeper semantic analysis of content attributes—such as tone, taxonomy (e.g., IAB categories), and customer journey stage—to deliver more contextually relevant recommendations. This enables more precise content activation, even when manual tagging is limited or inconsistent.
As an activation channel, these recommendations can be embedded directly into web experiences or email campaigns, allowing users to dynamically surface the most relevant content and drive deeper audience engagement.
Table of Contents