
The Audience element is required for any Omeda Scheduled Journey and allows users to choose the audience of the journey.
After adding an Audience element to your journey canvas and clicking the element, the journey creator can then provide details on their audience in the element inspector on the right side of the canvas.
|
|
Using the Audience Element
The Element Name will be set to “Audience 1” by default but this can be edited to better describe the Audience for the journey.
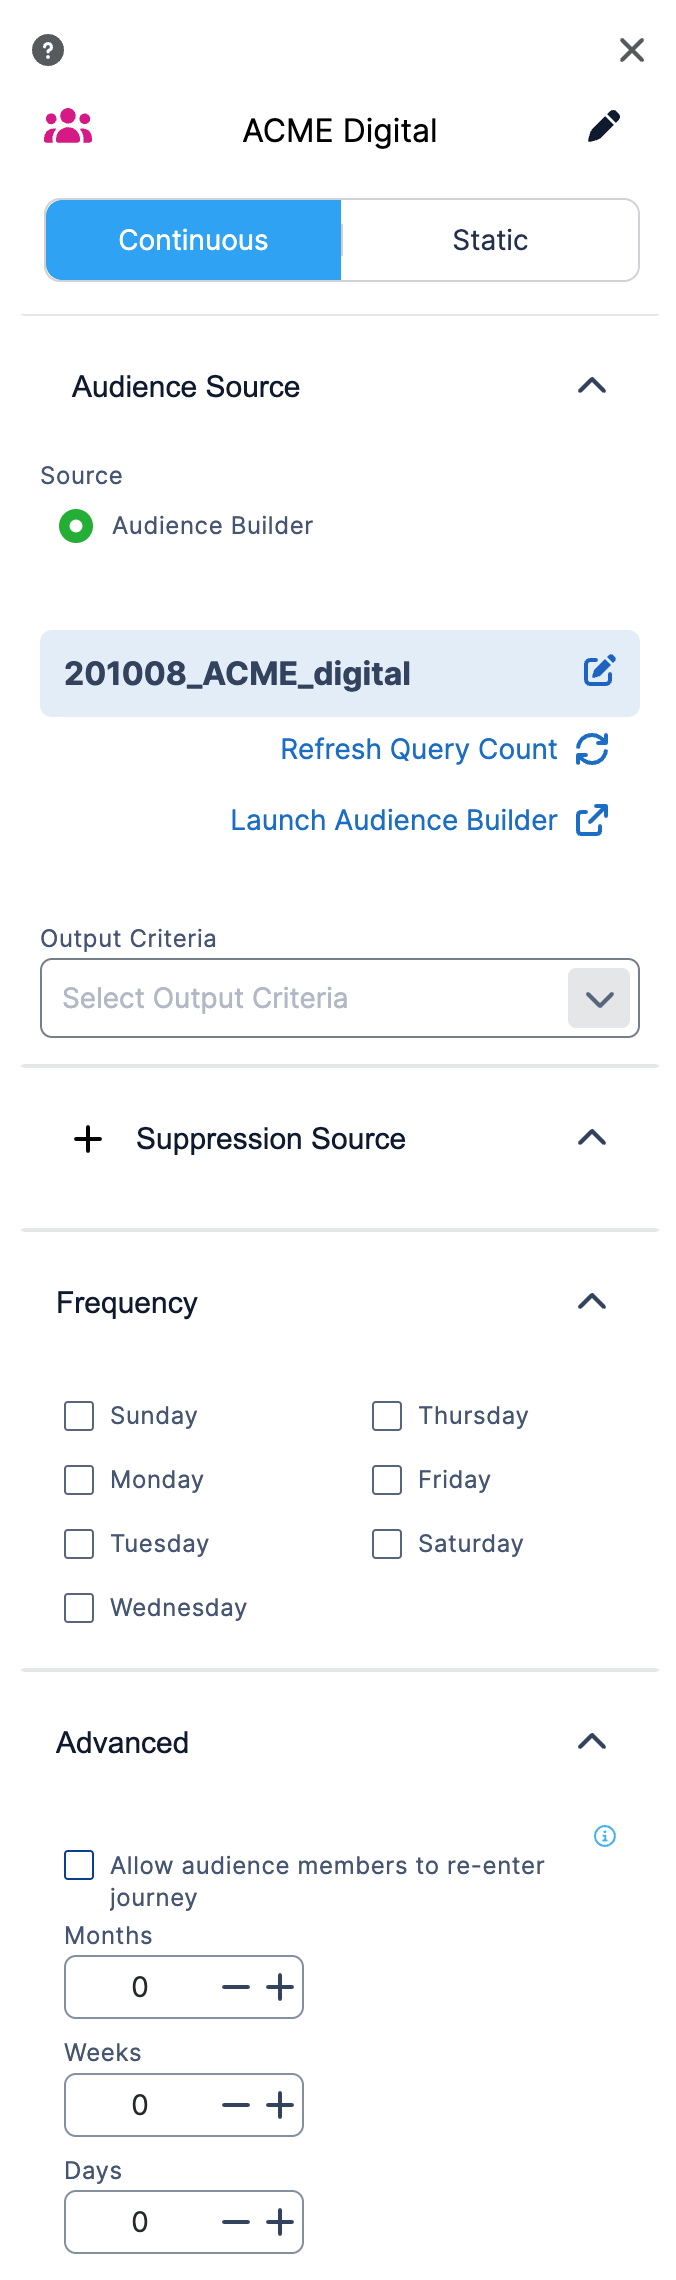
The first choice that must be made when configuring the Audience element is whether the journey will be continuous or static. Continuous journeys will be run at the frequency of your choosing and the audience will be refreshed each time the journey is run. Static journeys will run only once.
After selecting the journey type, you can then add your audience in the Audience Source pleat. The options available here will depend on whether your journey is Continuous or Static.
Audience Sources
Static Audiences
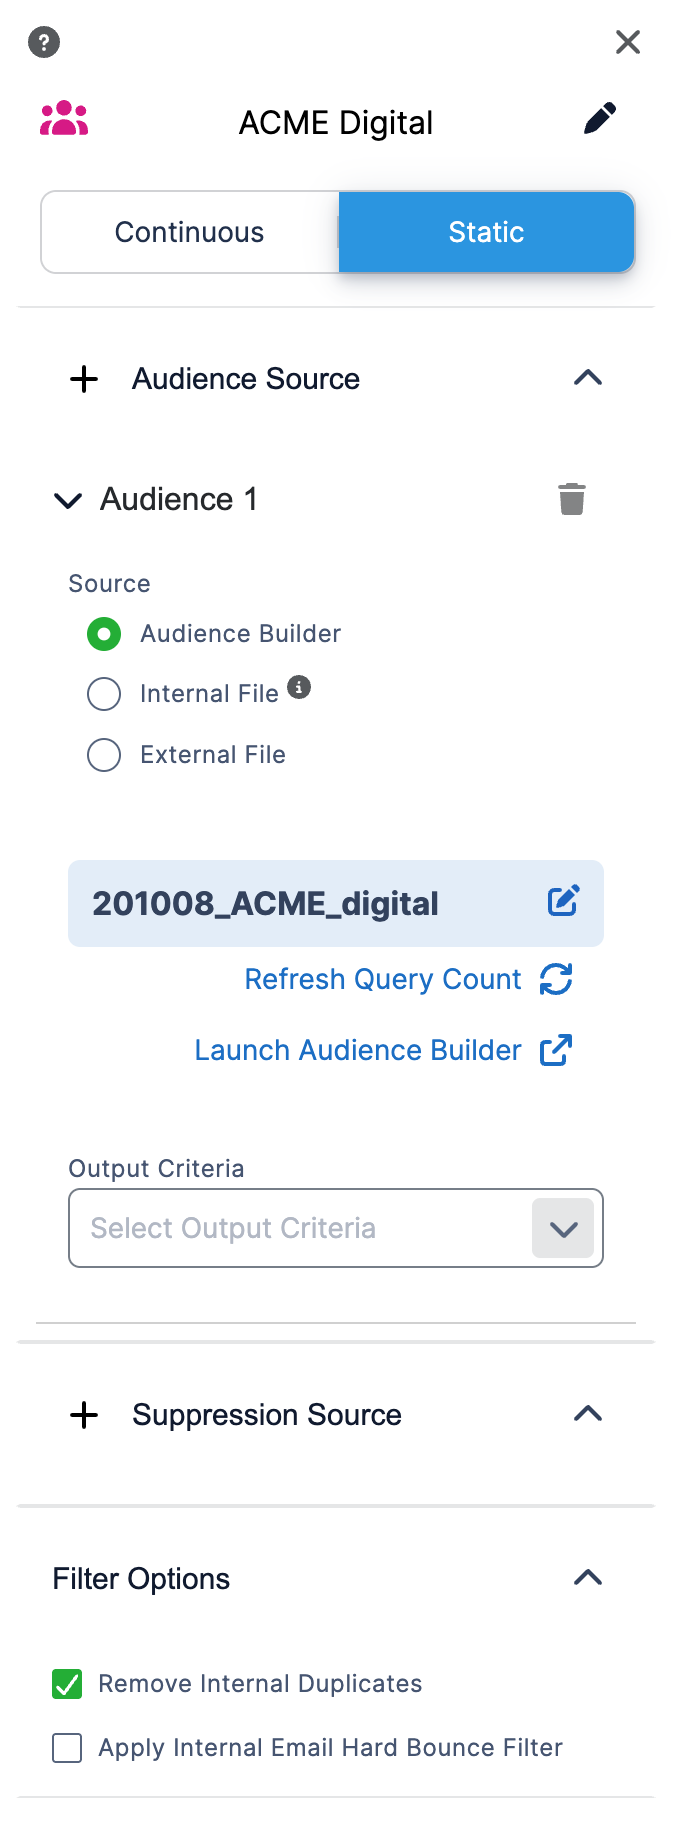
There are three Audience Source options available for Static journeys: Audience Builder, Internal File, and External File. Multiple Audience Sources can be created by clicking the ‘+‘ icon next to ‘Audience Source’.
Audience Builder
By selecting this option, your audience will be created from an Audience Builder query and refreshed before the journey begins. You can choose a saved query by clicking ‘Select Query’ and then clicking the Id of the desired query. You can review the query conditions or create a new query by clicking ‘Launch Audience Builder’.
When selecting this option you can also choose to select an Output Criteria to create a “custom output” for your audience. This will allow you to populate additional “custom” merge variables in the Email element or display additional fields in your deployment reports. You will need to be sure to select at least Customer Id and Email Address, and then you can add in any other fields you’d like to include. The selected Output Criteria will be applied to all Audience Builder sources in your journey.
Static Audience Builder audiences can also be nthed by checking the “Nth Audience Size” checkbox and providing the number of audience members you’d like to include for each Audience Source. All audience members that are not included in the nth selection will not enter the journey.
Internal File
The Internal File option allows you to choose a file that was previously output to Email Builder to use as your audience. To choose this option you must first select the deployment type within an Email Element. This will be a static version of an Audience Builder query and will not refresh prior to sending.
External File
With this audience source type, you can upload an External File to use as your audience. The file should be in comma delimited format with headers. The Email Address column header can use any naming convention as long as the string ‘email’ or ‘e-mail’ appears in it. After selecting the file, click ‘Upload to journey’.
Note: If your External File does not include Customer Ids, this Audience Source type is best suited for journeys that are limited to Email elements. Most other elements require that the audience file includes the Customer Id to function correctly.
Continuous Audiences
For a Continuous journey, an Audience Builder source must be selected. You can choose a saved query by clicking ‘Select Query’ and then clicking the Id of the desired query. You can review the query conditions or create a new query by clicking ‘Launch Audience Builder’. Your audience will be created from the query and refreshed before the journey begins and each time it runs. Each Audience Member will only enter the journey once, which means after the first iteration of your journey, only new members to your query will be included in future journeys.
When selecting this option you can also choose to select an Output Criteria for your audience. This will allow you to populate additional merge variables in the Email element or display additional fields in your deployment reports. The selected Output Criteria will be applied to all Audience Builder sources in your journey.
Note: If a journey is currently in progress and continuous, the Audience element can be paused so that the frequency and re-entry settings can be changed. Simply Pause the element, make your changes, and click resume.
Frequency
When the audience is Continuous, a Frequency pleat will appear where you can specify how often a journey should run in a week. At least one day must be selected.
Advanced Options
When the audience is Continuous, a new pleat will appear called ‘Advanced Options’. By default, after an audience member has entered a journey, Journeys will prevent them from entering again. In the Advanced Options pleat, users can instead choose to allow re-entry for their journey audience. If re-entry is allowed, users can then specify the amount of time that should elapse before an audience member can re-enter, with the minimum time period being one day. The wait time before re-entry is specific to each user so, if the re-entry period is one month, the audience member will re-enter one month after they last entered the journey, if they are still found within the Audience Source query.
Note: Make sure to consider the timing of your journey before selecting the re-entry time span. If your journey efforts span two weeks you may want to prevent re-entry until that two week time period has completed so that efforts don’t overlap for your audience.
Audience Suppression Source
For both Static and Continuous journeys, you can use the Audience Suppression Source pleat to suppress one or more Audience Builder queries or External Files from your journey. If using an Audience Builder query, audience members will be suppressed Customer Id. If using an External File, an Email Address or Customer Id must be included as columns in the file with a header. If both columns, are included, the customer Id value will be used to suppress.
After selecting or uploading one or more Audience Suppression Sources, the records will be matched against your Audience and matching audience members will be suppressed when the journey moves to In Progress. The Audience count on the canvas will not reflect the suppressed audience until that time.
Filter Options
In the Filter Options section, the checkbox “Remove Internal Duplicates” will be displayed and will be pre-selected. This will ensure that for each audience visit, audience members will be deduped by both Customer ID and Email Address before entering the journey. For journeys that contain a Digital Edition deployment type, this option will be unchecked and cannot be changed.
If an external file is selected, an option will display here, “Apply Hard Bounce Filter”, this will be unchecked by default. When checked, email addresses in the audience file will be filtered out of any email deployments if they are present in the Hard Bounce Filter.
If an internal file is selected, an option will display, “Apply Internal Hard Bounce Filter”, this will be unchecked by default. When checked, email addresses in the audience file will be filtered out of any email deployments if they are marked as Invalid.
Connections and the Audience Element
The Audience element can only be connected to a Schedule element.
Table of Contents