Audience Search – Group Subscription Management
Group Subscription Management
A group subscription provides access to a set number of authorized members, and allows a group administrator to manage the list of members. To manage group subscriptions, a group has to be set up in settings. There are two types of group that can be set up namely Admin Earns all and Earns across members.
Admin earns all: In this type of group, admin earns all the money and the members have $0 attached to them.
Earns across members: In this type of group, the admin and the members earn the money individually.
Creating a Group
Ensure the Group has already been setup in Settings. Only certain administrators have the privilege to setup groups. If you need to create a group and the group administrator already exists in the database, ensure you know his/her Customer Id.
Click on Settings, select your organization in the dropdown at the top, then select the brand (on the left) this group belongs to.
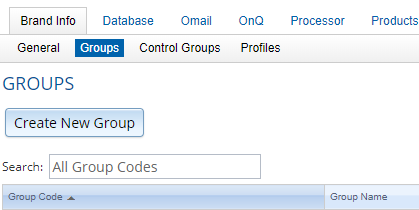
Click on Groups. This is where you can see all existing groups for your products. If your group doesn’t exist, then click the Create New Group button.

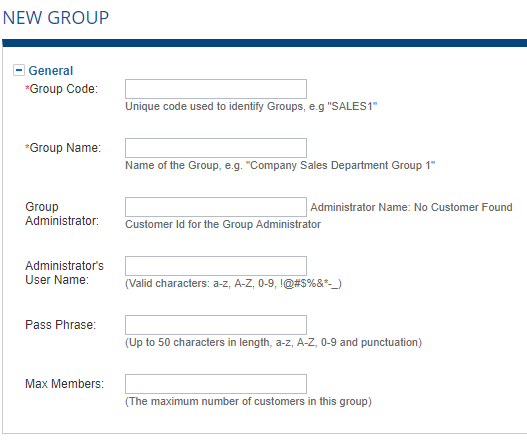
Enter a unique Group code and a unique group name. You will need to add in the customer id in the group administrator field for the group administrator.
The administrator’s username and the Pass Phrase can be used by the group member to log into a group membership page.
Max Members indicates how many group members are allowed in a group. Once the group membership reaches that limit, no more members may be added to that group. All these fields except the group code and group name is optional and are designed to work with Admin Earns All type of group.

Click on “Add Product”. Choose the product from the drop down. Enter the group price per member/Year. Choose the common expiration Issue from the drop down which has to be a future date. The earning code could either be Admin Earns All or Earns across Members. The admin earns all group works as follows: If the admin’s subscription is suspended, cancelled or expired all the group members subscriptions will be suspended, cancelled or expired. If the group admin gets re-activated upon payment, the rest of the group will be reactivated as well. For Earns across members, any cancellation, suspense or expire of the admin’s subscription will not affect the members’ subscriptions.

Click on the “Create” button. The group is created successfully.
Once the group is created, if you need to edit it, enter the group code in the search text box and press “Enter”. Click on the group to make any changes and hit save.

Adding a Group Subscription (Same steps for AEA/ EAM groups)
Once a group has been created, ensure the Group Admin and the Group Members have already been setup as a customers. In Customer View, search for the customer which will be the admin of the group. To add a new product click “Enter New Product” button
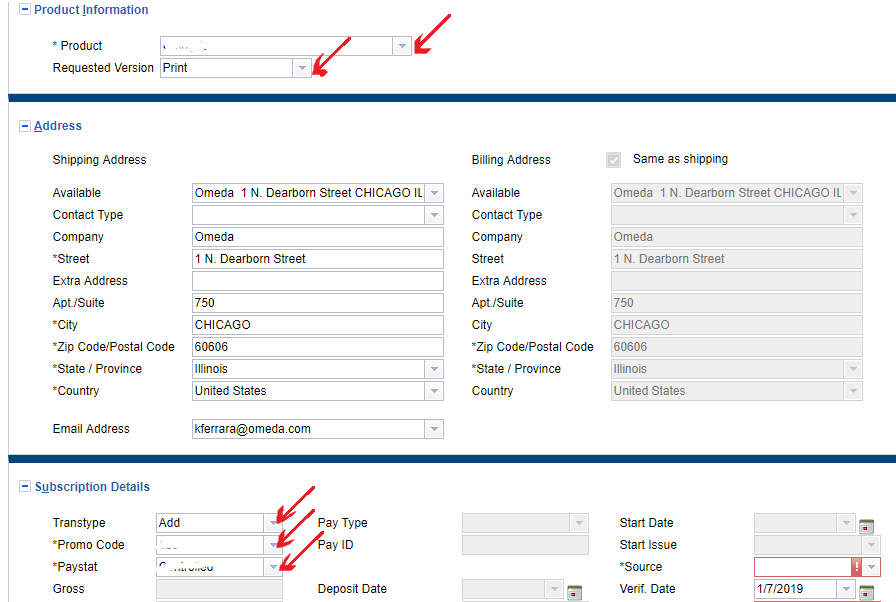
Choose a product for which the group is set up in settings from the Product drop down
Choose the requested version from the drop down
Choose the Transtype = Add or Renewal if the product subscription already exists
Choose the promo code from the drop down
Choose the paystat either paid with order or credit from the drop down.

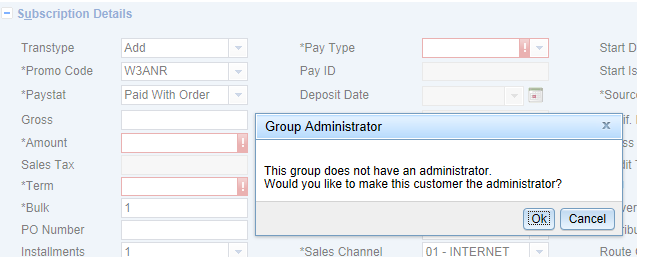
Choose the group code from the drop down. A pop up appears asking if this customer could be made the group admin. Click OK. The customer is made the admin and the customer ID would be populated in the Group administrator field in the settings section where the groups was created.

Term is auto populated based on the expire date chosen for this group in the settings section.
Enter the amount, Pay type, Pay ID and the Deposit date. You can select class 1 (active qualified) or select the group specific class 26/27 (non-receiving group admin). 26 is used on earn across members type of group where the admin does not receive an issue and doesn’t have any money tied to him/her. 27 is used on admin earns all type of group where the admin has all the groups money but does not want to receive the magazine.
Choose the source and audit type from the drop down. The admin creation is successful and is shown below.

Click on “Add another member” link in the lower left corner of the Groups section.
Enter the customer ID of the member in the text box and press Tab key.
The member is added as shown below. Repeat the above two steps to add more members if necessary. Click on the “X” to remove the member added. Also, you can add each member individually by adding a group code to the order window, which will tie the member to the group and group admin.

Click on demographics if demographics need to be added to the group admin’s record. Select or enter any appropriate values. (This is only updating the group admin’s demographics) **Please note-updating demographics for each member will need to be done on each member’s account.**
Click on “Save to pending” button.

Click Save Customer Updates.

An alert will appear saying “Saving ALL pending updates cannot be undone.” Click OK and then OK again.
Renewing a Group Subscription
Search for the admin customer ID
Click on the existing group subscription order.
Click on the “New Group order.”

Choose the requested version, Transtype = Renewal, Promo code and Paystat. Enter the amount and term. Choose the other mandatory fields. Under the groups section, list of existing members along with the admin is displayed. The user can add new members here by clicking on the “Add another Member” link. The user also has the option of pick and choose the members by appropriately checking the check box.
Click on demographics if demographics need to be added to the group admin’s record. Select or enter any appropriate values. (This is only updating the group admin’s demographics) **Please note-updating demographics for each member will need to be done on each member’s account.**
Click Save to pending.
Click on ”Save Customer Updates”
Adjusting a Group Subscription
Follow the same instructions in Adjusting a Subscription and adjust each group member’s subscription.
Suspending a Group Subscription
Follow the same instructions in Suspending a Subscription and suspend each group member’s subscription.
Reinstating a Group Subscription
Follow the same instructions in Reinstating a Subscription and reinstate each group member’s subscription.
Cancelling and Refunding a Group Subscription
Follow the same instructions in Cancelling and Refunding a Subscription and cancel and refund each group member’s subscription.
Table of Contents
