CDP - Personalization Overview
Getting Started
Personalization messages enable our CDP customers to display targeted content to their website audience directly on their websites. The most common way this is done is via a modal or pop up in the middle of the visitor’s screen. The modal would contain content that you want to draw the user’s attention to, like a renewal reminder, a newsletter subscription form, or an ad and would be targeted to visitors to whom that content would be relevant.
Personalization Dashboard
The Personalization dashboard can be accessed by clicking CDP in the navigation, under Acquire, then clicking Personalized Content. Here you can you can modify the General Settings, search for an existing Personalization, or create a new Personalization.
General Settings
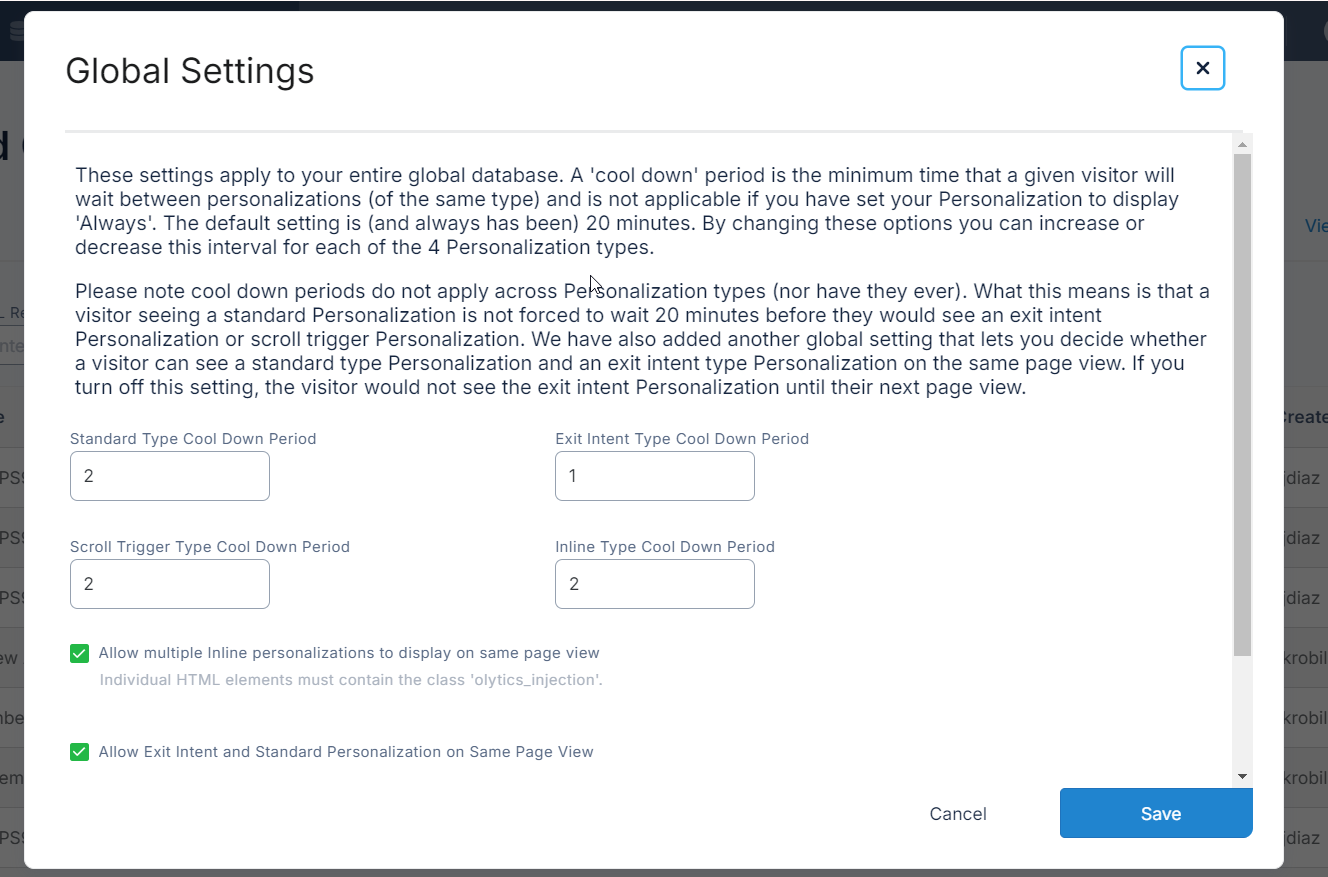
In the top right corner of the dashboard, click General Settings to modify the default settings for how all Personalizations and Meter Messages should behave.
Cool Down Periods
General Settings allow you to customize the standard wait time that is in place between personalization messages – both within types and in part across types.
The default is 20 minutes between each personalization message.
Inline Personalizations
In General Settings you can also choose to allow multiple inline personalizations to appear on the same page. For this to work, the targeted HTML elements must have the class ‘olytics_injection’.
Exit Intent & Standard Personalizations
Choose whether or not to allow an Exit Intent and Standard Personalization to display on the same visit (default is checked).
Auto-Archive Personalizations
Choose to archive all Personalizations after they’ve reached their end date. This will help to declutter your dashboard.
Automatically Track Links
Choose to automatically track any link found within your content. Learn more here.
Personalizations Table

On the Personalizations landing page, each personalization will be displayed in a table on the center of the screen.
You can use the filters at the top of the page to find the Personalization you are looking for. You can filter by:
Name Contains
URL Restriction Contains
Filter by Type : The table will always only show one type at a time. This is because the priorities for Personalizations are based on the type.
Filter by Status : Possible statuses are Paused, Active, Drafted, Future Start, or Passed End Date.
Filter by Position
In the table, the following columns will display:
Priority : If two personalizations have been configured to display on the same page, and target the same audience, the priority will determine which personalization the visitor will see. You can change the order by clicking the up and down arrows next to the priority number. If a visitor belongs to several different audiences and falls into multiple personalizations, they will be see the highest priority personalization.
Name : the name of the personalization as it will display in reporting.
Status : the current status of the Personalization:
Active – currently running on the site
Drafted – Personalizations that are still in the creation stage and have not yet gone live
Paused – stopped for some reason, but able to be reactivated
Passed End Date – Old Personalizations that have expired because of the set end date
Future Start – the Personalizations that will be active when the Start Date has been reached
Position: Where on the screen the personalization will display.
Frequency: How often the Personalization would be shown to the same visitor
Date: If a Start or Start & End Date are set, it will display here.
Created By: The user who created the Personalization
In the ellipsis menu on the far right, you can do various actions including:
Test: This will display the personalization in your browser.
Edit: This will open the personalization so you can make changes or view the configuration.
Clone: This will clone the selected personalization so you can quickly create another personalization using the same settings.
View Report: This will take you to the reporting section of Personalization. For more information on the reports, see Personalization Reporting
Archive: This will remove the personalization from the table and put it in an ‘Archived’ section. This helps you keep your dashboard organized. For detailed instructions, check out Personalization Archiving.
Set Priority: This will open a modal where you can change the priority ranking without having to use the up/down arrows in the priority column.
Delete: This will remove the personalization entirely, including any and all reporting metrics related to it.
Creating a New Personalization
A new personalization can be created for a site by clicking New + and then Personalization from the dashboard.
Step 1 : Basic Information
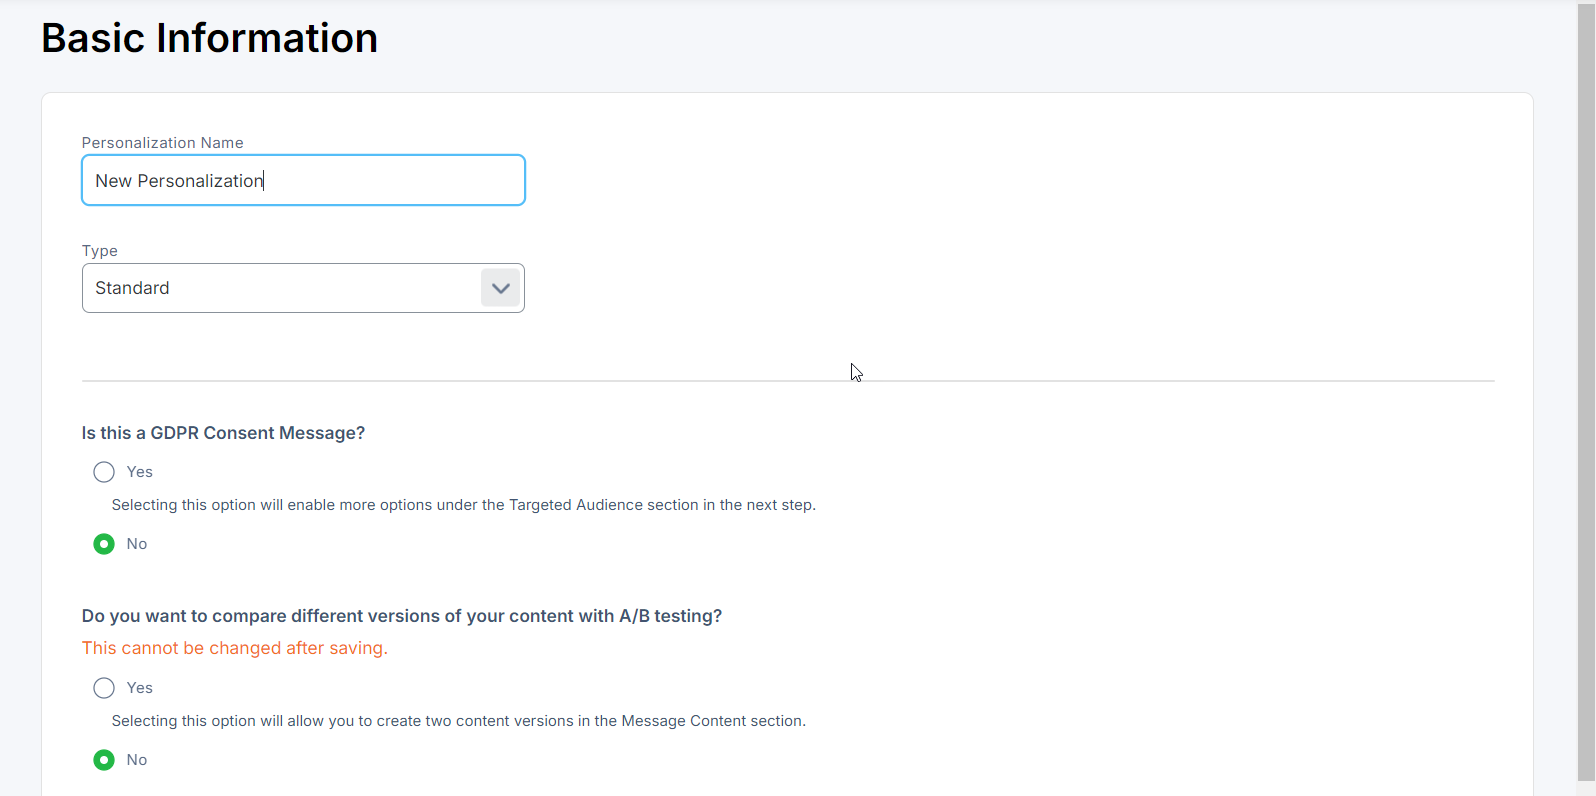
The first step when creating a Personalization is to provide some Basic Information.
Here you must provide the following:
The Name of your personalization
The Type of your personalization. There are four types to choose from:
Standard (default type): Has various options for displaying a Personalization popup. It is triggered when a person visits your site.
Inline HTML Injection: Personalization appears as part of the website HTML within one of the site’s existing elements. The personalization content can insert or replace content on your site. This can be used in tandem with standard Personalizations.
Exit Intent: Similar to Standard but with limited display options. This type of Personalization has its own priority ranking since it is only triggered when a visitor moves the cursor to the top 20% of the site.
Scroll Trigger: This type of Personalization will appear once someone has scrolled down a selected percentage of the page. Like Exit Intent, this type of Personalization has its own priority ranking since it is only triggered when a visitor scrolls down the page.
Whether the personalization is a GDPR Consent Message. If Yes is selected, you can choose to require a user response before closing the modal or to not display if a user has already consented to ‘yes’.
Whether you would like to use A/B testing for your Personalization. Learn more about A/B testing here.
After you’ve set your choices, click Save & Continue. After saving, you can now navigate to any section on the left-side of the page to continue your set up.
Step 2 : Audience
In the Audience step you can specify the audience you would like to target with your personalization in the following sections.
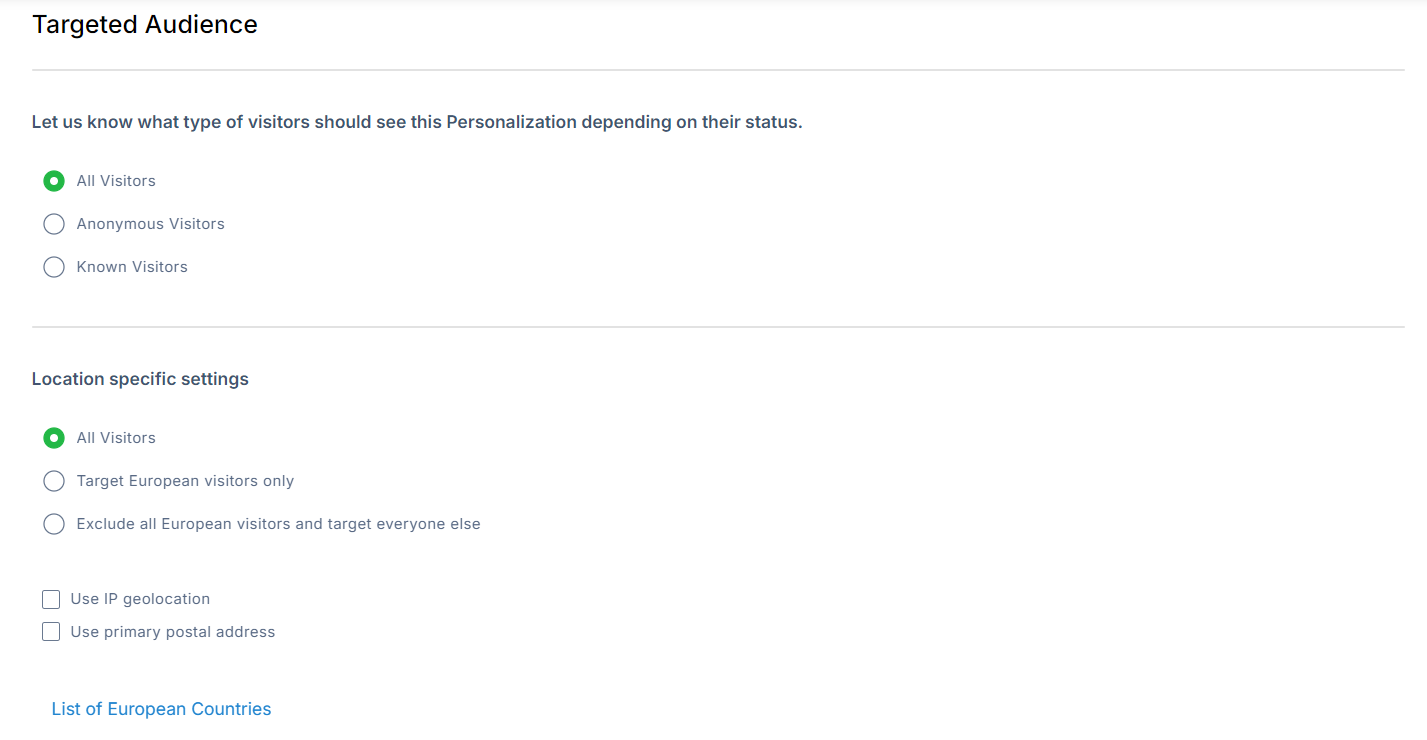
Targeted Audience
You can choose to target a broad segment of visitors by targeting all visitors, all anonymous, or all known visitors.
Audience Builder Selection

In the Audience Builder Selection section you can target (or exclude) audiences using a saved query.
Product Targeting

In the Product Targeting section, you can target or exclude audiences based on the Products they are subscribed to and the Classes they are in. Optionally, you can select the pay status(es) you want to target or exclude. If at least one value has been selected for both Class and Payment Status, a visitor must meet both conditions to be targeted by the Personalization.
Once you’ve made your selection, you can choose to either target those visitors or exclude them using the checkbox in the top right.
Step 3 : Restrictions
This tab allows you to specify which pages and domains the personalization should display on.
URLs
Target Only Specific URL Patterns: This will only display the personalization if the site contains the provided URL patterns. Therefore, you can do a wildcard match that will display the personalization on all the the sites that have the URL inclusive of the site.
Exclude from Specific URL Patterns: This will exclude the personalization from the specific URL parameters that are provided. You can do a wildcard match that will encompass any sites that are included within the URL parameters.
Entry Points
Target Entry Points: The personalization will only appear if the visitor came to the page from a specific entry point.
Exclude Entry Points: The personalization will not appear if the visitor came to the page from a specific entry point.
URL Parameters
Target Parameters in a URL(s): This personalization will only appear if parameters and their values are included in the URL string.
Exclude Parameters in a URL(s): This personalization will be excluded from sites where these parameters are found in the url string.
Entry Points
Target Entry Points: This personalization will only appear if the user visits from any listed entry point.
Exclude Entry Points: This personalization will be excluded from sites if the user visits from a listed entry point.
Attribute Targeting
Target or Exclude Pages using Olytics Parameters: Personalizations can be targeted to appear or on sites based on their Olytics.Fire parameters or excluded based on the Olytics.Fire Parameters. The link can be clicked to open a modal where Olytics parameters can be selected from a drop down and values can be added. Multiple parameters and their values can be targeted using AND or OR conditions. To exclude, check the exclude checkbox that appears.
URL Parameter
Target or Exclude pages where a specific URL parameter is contained within the URL.
This is a good option to use with UTM tags. You can use this alongside targeting an audience or you can use it as a stand-alone audience selector that displays for everyone as long as they have that UTM tag included in the url.
Target Meta Tag
Target by Meta Tag: When this option is selected, we will only show the Personalization on pages that contain this meta tag. This can be useful if you have a data layer you want to target – as you can code your site to only write this meta tag to certain pages based on values in your data layer.
This allows you to target pages of your website that might not follow URL patterning. You will find the option within the Configuration tab. Each personalization will generate a meta tag unique to that job. If you want to target using Meta Tag, check this box and implement the code on your website to the desired pages. If you are not targeting by Meta Tag, simply leave this box unchecked.
Device Type
In this section, you can tailor personalization messages based on the user's device and whether they are using ad blockers.
Step 4 : Message Content
In this section, your personalization content can be created and stored.
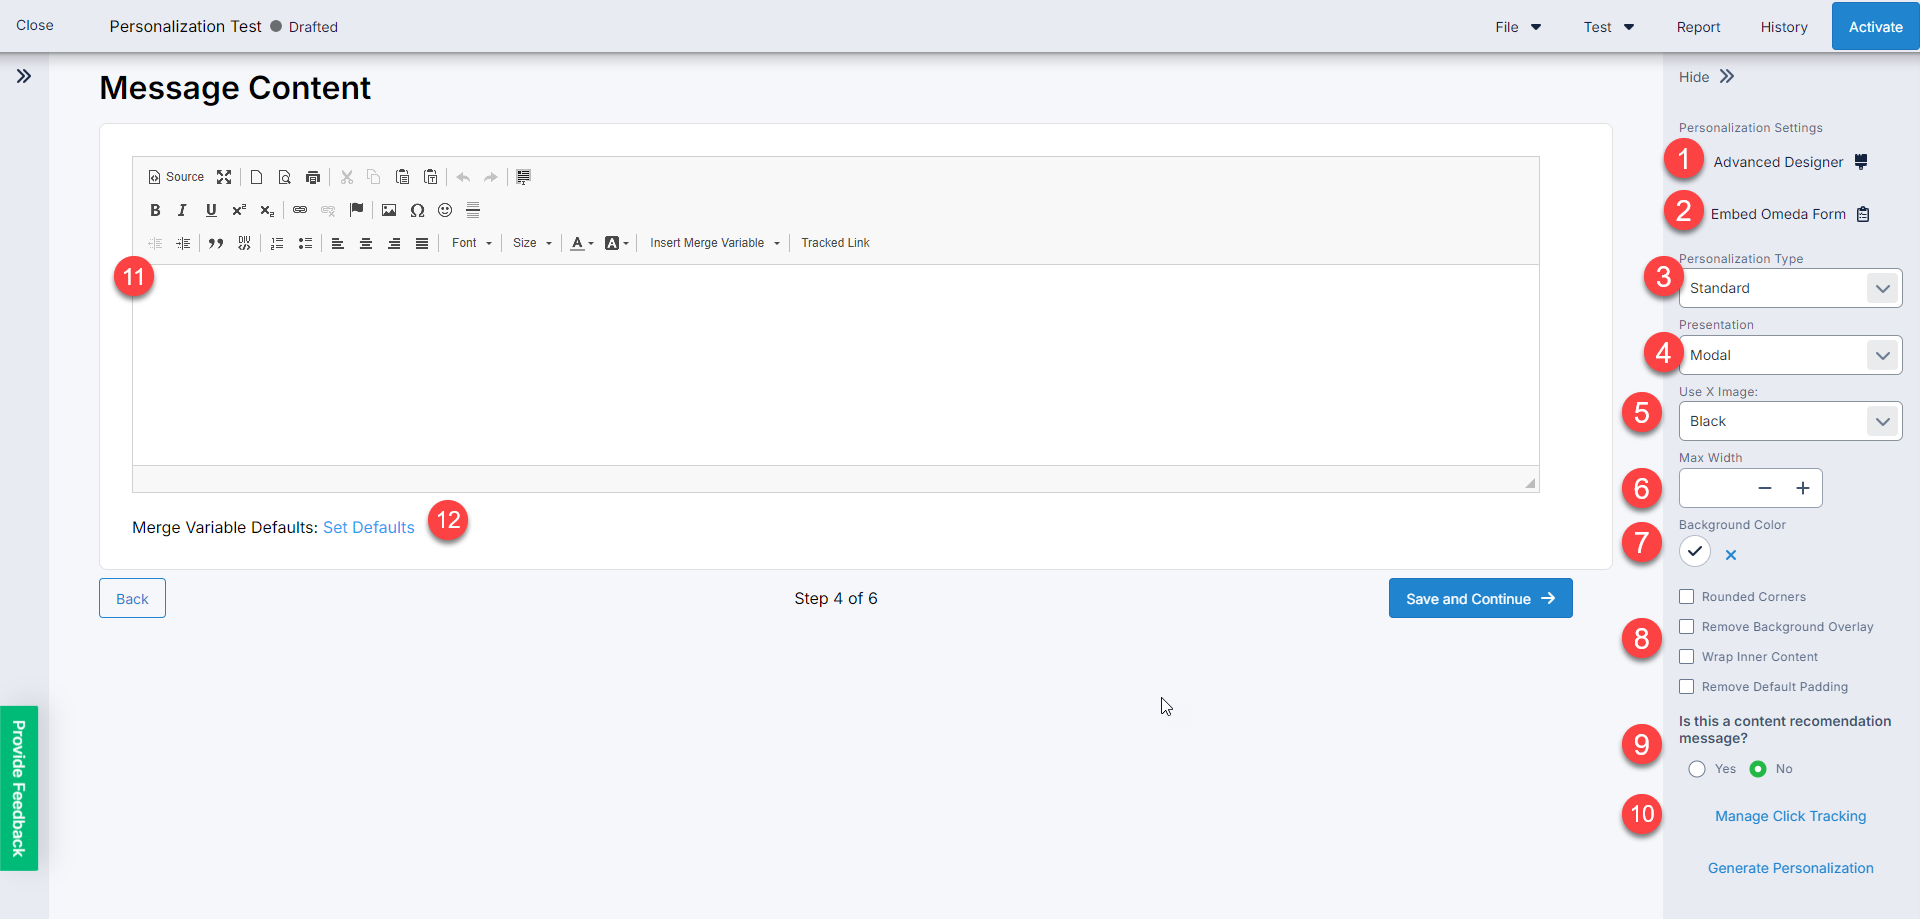
Advanced Designer : Using the Advanced Designer, users can create an attractive personalization using drag and drop functionality.
Embed Omeda Form : To include only an embedded Omeda form in your content, click this button to select your form.
Personalization Type : By default the Standard message type will be selected, but you can also choose to select a Scroll Trigger or Inline (HTML Injection) message type. The Scroll Trigger type will display the personalization after the user has scrolled a percentage of the page, while the Inline type will replace content on your site with the personalization content. The HTML Id field will display for these message types which should be populated with the HTML id of the div containing the content that should be replaced.
Presentation : There are currently 10 placement options to choose from including: Modal, Bottom Right, Bottom Left, Top Right, Top Left, Bottom Middle, Bottom Footer, Top Header, Top Persistent Bar, Bottom Persistent Bar, Right Persistent Box, and Left Persistent Box
Modal: Will appear as a box in the middle of your web page
Bottom Right: A box will rise from the bottom right of your web page
Bottom Middle: A box will rise from the bottom middle of your web page
Bottom Left: A box will rise from the bottom left of your web page
Top Left: A box will drop from the top left of your web page
Top Right: A box will drop from the top right of your web page
Footer Popup: A bar will rise across the entire bottom of your web page
Header Popup: A bar will descend across the entire top of your web page
Top Persistent Bar: A bar will descend across the entire top of your web page. It will not disappear unless the viewer clicks the “x” on the right side.
Bottom Persistent Bar: A bar will rise across the entire bottom of your web page. It will not disappear unless the view clicks the “x” on the right side.
Right Persistent Box*: A box will appear on the right side of your web page – You’ll need to select how far down the page it will appear (in % or pixels). It will not disappear unless the view clicks the “x” on the right side
Left Persistent Box*: A box will appear on the left side of your web page – You’ll need to select how far down the page it will appear (in % or pixels). It will not disappear unless the view clicks the “x” on the right side
Use X Image: Allows you to choose how a visitor can close a non-blocking display and in what color(s).
Max Width: This is applicable to the bottom right and bottom middle modals only. The current defaults for bottom right is 1/4 screen width and bottom middle is 1/3 screen width.
Background Color: Color of the personalization background
Additional Options:
Rounded Corners: This simply rounds the corners on the message boxes.
Remove Background Overlay: By default, the web page will have a gray overlay when the message appears on the screen. Clicking this box will keep the web page as is, so the background behind the modal/banner will still be active and not be hidden behind the gray overlay.
Wrap Inner Content
Remove Default Padding
Content Recommendations : If you’re a Content Recommendations user, you can select this option and select a behavior to include recommended links in your content.
Manage Click Tracking : Use this option to manage the links in your message. Toggle on click tracking to track the clicks from your users.
WYSIWYG Editor : You have the option to start from scratch or even using HTML by clicking the source button to build your message. Get a jumpstart by using the “Generate Message” button on the bottom right. For a list of the merge variables and how to use them, see Merge Variables
Merge Variable Defaults : This option will allows users to set default values for the merge variables when that field isn’t present. For example, if you have a known user, but their company isn’t in their profile, you could set a default to put in the place of their company name.
With Merge Variable and company is present: We hope to see everyone from Your Company at the conference.
Merge Variable without a company present and without a Default: We hope to see everyone from _______ at the conference.
Merge Variable without a company but with a Default (default – your team): We hope to see everyone from your team at the conference.
Each personalization message can be tested up to 3 different ways by clicking the Test button in the top right corner of the page. It is recommended that you test using each of them before turning the activation.
Quick Test: Will display the personalization on the current screen
Test with a Customer Id: If you are using merge variables, then you can test with a Customer Id from your current database
Save and Test on My Site: Enter a URL to verify how the personalization message will display on your site. This option creates a temporary link that will expire. This is ideal for testing as the CSS script on your site will sometimes impact how the personalization appears when live.
Step 5 : Scheduling
Priority
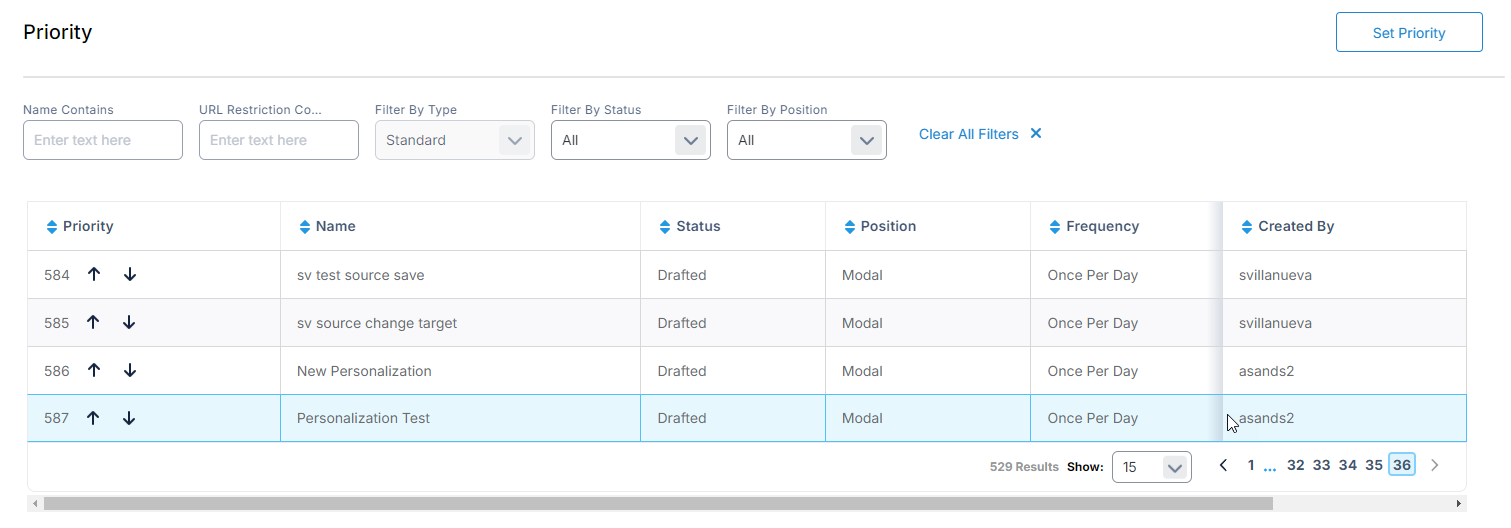
Priority is one of the determining factors when it comes time to show a visitor a Personalization. By default, each new Personalization is given the lowest priority. You can change the priority at any time.
There are several items to consider when choosing the priority for your Personalization:
A visitor can be targeted by multiple Personalization messages
The domain and pages targeted for the Personalization message
The frequency of the Personalization message is set to be displayed
The Start and End Date of the Personalization message
If a visitor is targeted by multiple Personalization messages, the next standard Personalization message in priority will not appear for 20 minutes after the previous message appeared with the exception of GDPR Personalization messages. When the Personalization message is flagged as a GDPR message, then the next Personalization job will fire 5 minutes after.
Timing

Display

Set a Frequency: Set the frequency at which the Personalization should appear for your visitors. By default, this will be set to Once Per Day.
You also have the option to set a wait time before your personalization job displays. Delay options are selected from the dropdown and range from 5 seconds to 30 minutes.
Start Date/Time and End Date/Time: Setting a start and end date/time for your Personalization message is optional. It is a nice feature to use when jobs need to start and expire within a certain time frame e.g. when you’re targeting visitors to register for an event. Time selections are in Central Time.
Note: If no end time is provided, the personalization message will expire at 12:01 AM CT on the ‘end date’ you have selected. Likewise, it will start at 12:01 AM CTon the ‘start date’ that you have selected.
Target by Number of Interactions: You may have a need to limit the number of times a personalization is shown, especially if there is no traditional conversion metric for that job where they no longer meet the target audience (i.e. after someone subscribes for a newsletter, they will no longer see the effort).
You can choose to limit the number of “interactions” over a set period of time with this setting. Close Button clicks and Impressions can also be taken into account for this setting as those can both be considered an “interaction”. The default is to include these in your interaction count. If you do NOT want to include these in your interaction count, check the box next to which (or both) you want to exclude in the measure.
Note: If you have click tracking on any links within your content, clicking on that link will count as an “interaction”.
Step 6 : Summary
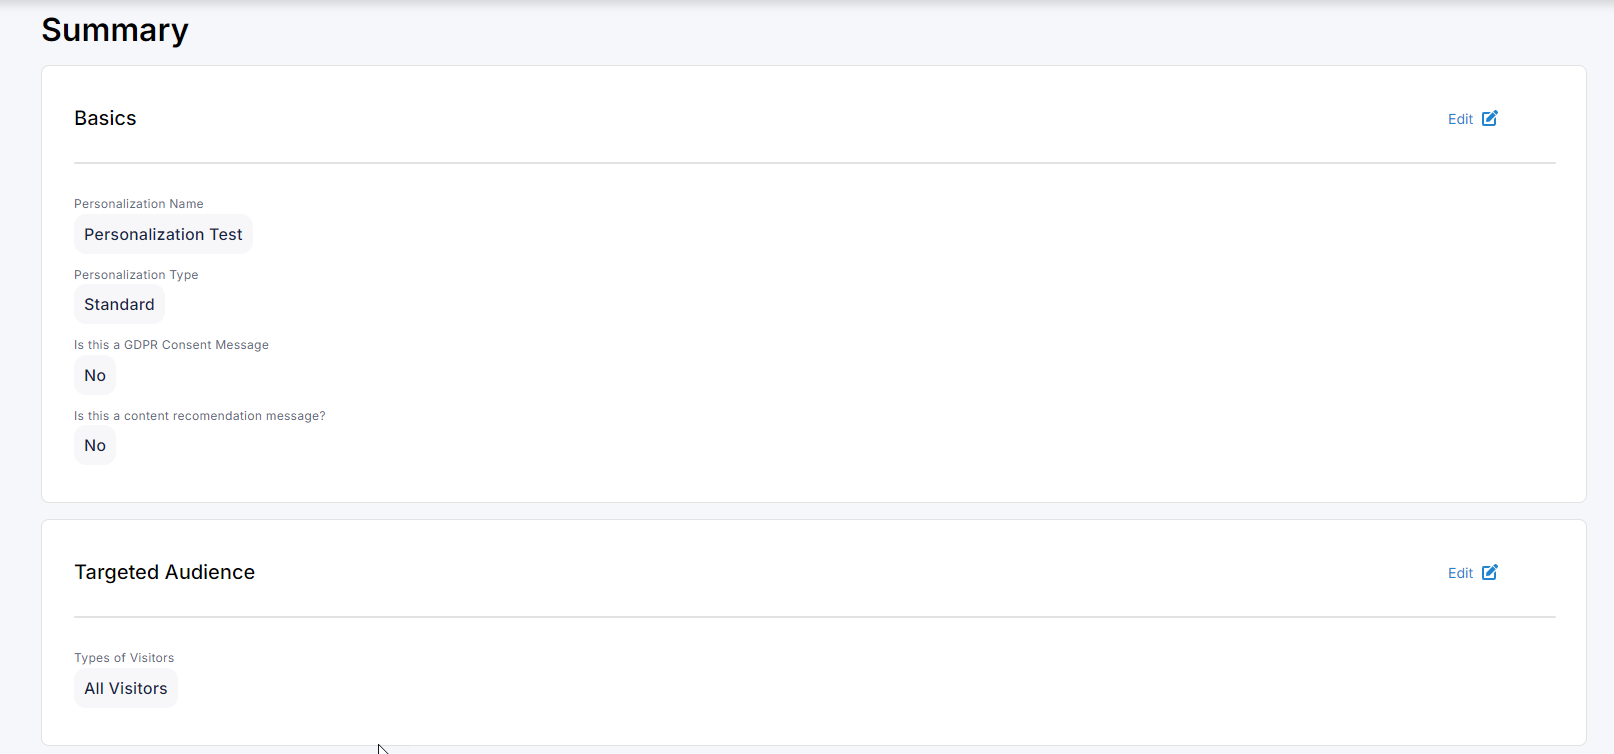
Once you’ve scheduled and verified the personalization works as expected, you can review your a summary of the configuration in the final step. From any step though, the personalization can be activated from the blue Activate button on the top right.
Personalization Types
There are four types to choose from when creating a personalization: Standard, Inline, Exit Intent, and Scroll Trigger. The steps above describe how to create a Standard personalization but there are some differences between each.
Inline (HTML Injection)
With this option the Personalization is integrated into your web site so you’ll need to know which HTML element you want the Inline Personalization job to show up within. You will also notice Inline has fewer options than the Standard Personalization. By default, only one inline personalization will appear on a page at a time to a targeted user based on priority. To display multiple inline personalization on the same page, the class “olytics_injection” can be added to each targeted element on your pages and the “Allow multiple Inline personalizations to display on same page view” should be selected in General Settings.
Exit Intent
This type of Personalization will only display when the visitor moves their cursor to the top 20% of the screen at least 20 seconds (default).
Differences are:
Default to exclude Mobile
No Delay
No GDPR option
Option to set wait time before it triggers (similar to Standard Type)
With the Exit Intent, you do have the option to adjust the 20 second wait time up or down, or remove it entirely, so as to customize how long the visitor is on the page before this triggers when they go to leave.
Scroll Trigger
This type of Personalization will only display when the visitor scrolls down a certain % of the page.
Differences are:
Presentation does not allow for top or bottom persistent bars
No GDPR Option
Unique to this type, you will need to select the scroll % that will trigger this Personalization. (Default is 20%)
If you are setting up a scroll trigger for an infinite scroll page, here are some additional things to keep in mind: Scroll Trigger & Infinite Scroll Pages
Looking for more information on Personalization? Check out these related pages:
Personalization – HTML Templates: There are 6 HTML templates you can copy/paste into the source code of a new personalization job
Personalization FAQs: Find short answers to the most commonly-asked questions about Personalization
Questions? Contact your Client Success team member for additional insight and strategic planning – clientsuccess@omeda.com
Table of Contents
